Sunchokes and a twist on patate pizza
 At the Union Square greenmarket late on a Saturday, I stopped at the Paffenroth Gardens stand looking for some butternut squash. Two of the women working at the farm stand table were discussing the miracle-like qualities of sunchokes, aka Jerusalem artichokes, to cure diabetes. I stood there long enough to pretend to be examining the produce left on the table to overhear claims of how eating these little knobby tubers regulated a woman's blood sugar levels. I was intrigued. Maybe I should be eating these? Why aren't I eating these? I grabbed a green net pint box and started filling it up with these unimpressive looking veggies. I quickly checked with the above mentioned sales lady, "I cook these just like a potato?", I asked. "Yep," "However you like your potatoes, you'll like these. Roast them, or mash them." I threw them in my bag and off I went feeling brave and adventurous, completely forgetting about the obligatory butternut squash.
 I went home and all my plans of roasted sunchokes went out the window when the memory of Jim Lahey's Patate Pizzathat you can get at the Sullivan Street Bakery suddenly came to mind. And that's all I could think about. Forget roasting and mashing, I needed to know if the supposed delicate flavor of the sunchokes could star in their own version of a pizza. Lahey's potato pizza is the stuff of my dreams. Bread and potatoes and cheese being high up there on my list of foods that make me happy. I'm a simple girl, really. If you have never been to the Sullivan Street Bakery, you need to go. If your scared of carbs, I can only suggest you stop living in the past, and start embracing the staff of life.
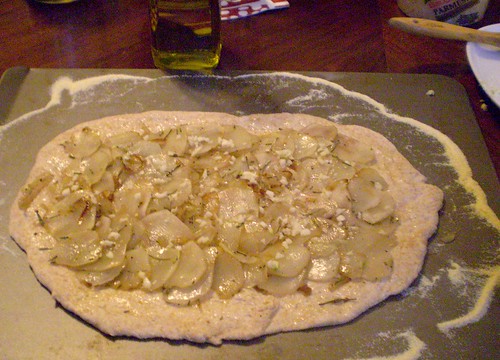
 I used the dough I already had in my refrigerator for the pizza dough. It was a whole wheat dough from Artisan Bread in 5 Minutes a Day that I keep in there to make batches of bread, but it also works in a pinch for pizza, as long as you're down with whole wheat pizza. That's where my "healthy" pizza attempts max out. I'll admit I could use a little work on the shaping of the crust. For the record, I was attempting a nice rectangle shape. At this point I was sort of winging it after consulting a few non-tomato sauce pizza recipes. I flavored the sunchokes much in the same way I would have had I roasted them - sauteing them in a pan with a little olive oil, some sliced garlic, fresh rosemary and salt and pepper. I sliced them on a mandolin first to ensure they'd be paper thin and pretty looking.
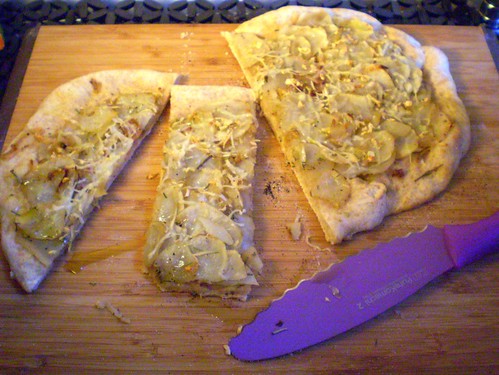
 For full disclosure, I should tell you that in addition to the amazing healthy properties sunchokes can have on your body, I have also read a lot about them being hard to digest, and causing some embarrasing gastro issues. I didn't notice any problems, but I did take the time to peel them first, since some sources suggested the culprit was in the skin. For a better discussion of the effects, see the very scientific and very opinionated comments on this post. If I was the type of person to have cocktail get-togethers in my fabulous loft, I would consider serving this in slices. However, I am definitely the type of person that pushes the limits on how much sugar she consumes, so I will consider eating more insulin- regulating-vegetables that can be served in the form of pizza. And, so should you.
Sunchoke Pizza Use a fresh store-bought dough, or your favorite pizza dough recipe. If you are an Artisan Bread in 5-Minutes a Day convert, use any of the recipes they suggest for Pizza dough.
1 pint of sunchokes, sliced on a mandolin (peeling is optional) 2-3 garlic cloves 3 sprigs fresh rosemary, or to taste 1-2 tablespoons olive oil 3/4 cup freshly grated Parmesan or Pecorino cheese
Scrub clean the sunchokes and slice them on a mandolin, or in even slices about 1/8 inch thin. Slice garlic cloves.
Heat olive oil in a saute pan until hot, add the sunchokes and garlic and rosemary and cook until the sunchokes taste almost completely cooked, meaning not totally mushy soft, but wilted. Keep an eye on it to not burn the garlic. Season to taste with salt and pepper.
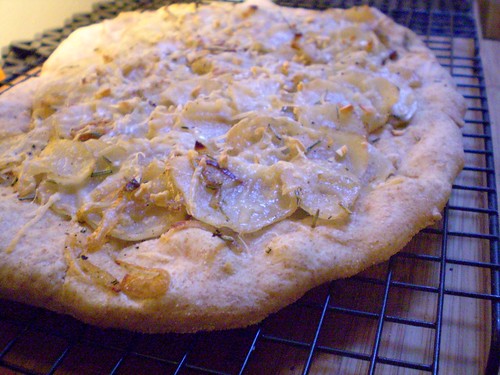
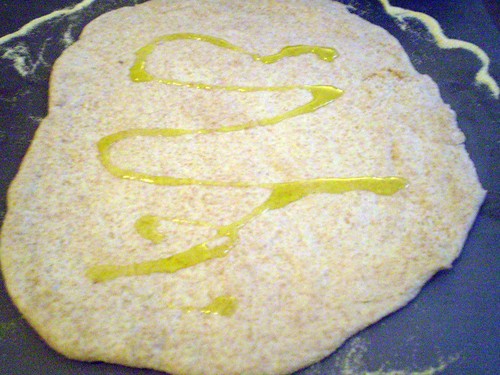
Roll out your pizza crust. Brush with olive oil. Top with sunchokes, overlapping them as you fill the pizza surface. Leave an inch around the edges for the crust. Sprinkle the top with cheese.
Let cool slightly, slice and enjoy.
Bake at 450 degrees Fahrenheit on a pizza stone for about 10 minutes or until the crust appears done and cheese is melted.