Chickpea Salad - Picnic posts

Chickpea Salad

It's officially summer. Summer makes me think of picnic-ing in the park, reading a book by the beach and running after the ice cream truck when I was a kid. That's my idealized summer. In reality, summer for most of us still means going to work even if it's gorgeous out, and squeezing in some outdoor time during the week. I love the concept of picnics but the closest I've come to one this year, was last week when I bought a taco from the Endless Summer truck and ate it sitting down by the parking lot around the corner. That's why I'm going to do a series of posts this summer on perfect picnic food. Hopefully to encourage you, and me, to plan some meals in the great outdoors, or at least near a tree. I made this little salad one night when it was too humid to think about using the stove and I had a lot of leftovers from the mixed greens salad I made for dinner. I threw this together thinking it would benefit from a night in the fridge and I'd have another lunch (or dinner) without cooking. It worked. I decided to make this my first post in the picnic series, because even though it's not novel, it's easy and hearty, no need to cook pasta or another grain. It's the type of salad that you can and should dress the night before. It's an all-in-one package picnic food, no need for separate bottles of salad dressing or a knife. Unless you're the type that has a wicker basket, and a wine glass holder for the grass (I've seen this in person), unfussy food is the only food you should picnic with. And, if you are that person, here's hoping the cops arrest you for so unabashedly drinking in the park.
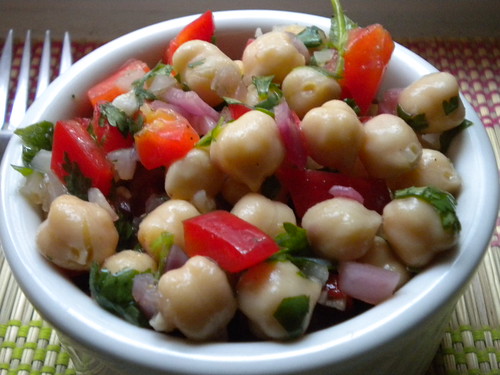
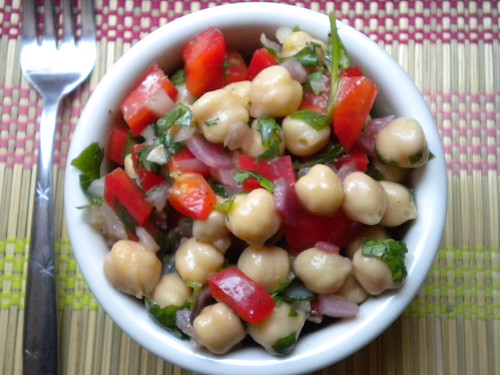
Chickpea Salad

Make this the night before or at least a couple of hours for the flavors to combine.
  • 1 can of chickpeas
  • 1/2 of a large red bell pepper, diced
  • 1/2 of a red onion, diced fine
  • 1 garlic clove, minced
  • Large handful of cilantro or parsley, chopped
  • 3 tablespoons red wine vinegar
  • 1/2-1 teaspoon cumin (or to taste)
  • Drizzle of honey
  • 1/2 cup extra-virgin olive oil
  • Salt and Pepper to taste
  • Juice of 1/2 lime before serving

Rinse the chickpeas well and place in a large bowl. Set aside. Meanwhile boil 1 cup of water. Place chopped onion and garlic in a small bowl and pour the boiling water over them. Let sit for 1 minute to mellow out the raw onion, garlic taste. Strain.

Combine chickpeas with the chopped red pepper, onion, garlic, and cilantro. Next make the vinaigrette by combining the vinegar, cumin and honey in a bowl. Whisk as you pour in the olive oil to emulsify. Add salt and pepper to taste. Pour over the salad and toss well. Taste again to see if it needs more salt. Before serving, squeeze half a lime over it to brighten the flavors a bit.

Pork and oyster sauce noodles with a side of confession

 P9190435.JPGWeeknight dinners. They're the stuff of countless women's magazine articles, on how to make them faster, cheaper, healthier and hopefully exciting without reaching for a frozen box of processed something. I've tended to handle this problem in one of two ways - the ordering in approach (after all I deserve it - I worked all day), or the slow graze on anything and everything in the kitchen. The latter has been the more popular method recently thanks to my household deficit. So, that means, frankly, that behind the scenes of this blog, I eat a lot of cheese on crackers, or eggs in a basket for dinner. This elaborate feast is often followed by a second course of hummus, or cereal, or frozen dumplings, depending on my mood. That's the truth, and I'm ok with it because at least nothing is processed crap. It works for me, until I get bored and re-inspired that I can do better. I recently found a new option, one that I think you'll love as much as I have. It's a dish that with a bit of advance shopping on the weekend, will have you reaching for that take-out Chinese, or Thai menu a little less in the future.

This discovery was the result of my search to find more Asian-inspired quick dinners, which is just the phase I'm in. Last year all I wanted was Italian. I also realized that my collection of rice noodles, udon noodles, soba noodles, bean threads and various other ingredients I buy on my trips home to Queens were taking over my kitchen cabinet and I had no real plans for them. Don't even ask about my failed attempt to make summer rolls. Last week, on my lunch break I found myself browsing the cookbook section of the New York Public Library, where I found Ken Hom's Quick Wok cookbook. It looked like it could be the solution to my problems. After all, I had almost all the ingredients in my pantry for all the noodle and rice dishes. P8040372.JPG

 The first night I brought this book home dinner plans were another grazing night through the fridge, but I was so anxious to try one of Mr. Hom's recipes that I immediately set out to make this dish, despite the fact that I was missing the star ingredient, ground pork. I prepped the rice noodles (see photo above, the Pad Thai kind) and the ginger and the stir-fry sauce, which is mostly oyster sauce and a little stock. It all came together quicker than I could imagine. As, I was tossing the noodles in the pan and flinging oyster sauce all over my shirt, I realized they looked a little sad. Desperately, I looked for something in the freezer to add to this. Potential options included, frozen sausage, a lone chicken thigh(what was my plan for that?), breakfast sausage, frozen peas, when I spotted a bag of Ikea meatballs that D had bought. Could this work? In a move that was one part genius and one part pathetic, I took a bunch and chopped them up. My brain was mildly disgusted, but my stomach was winning the debate. I quickly added them to the noodles, and told myself it was ingenuity at it's best, and I should send the idea to Ikea Hacker. Now, that you all know how grimy things can get in my kitchen, let me redeem myself and say, after I ate it, I knew the noodles were great and I also knew that I'd have to do better, a lot, lot, better, before I shared this.

This past weekend, off I went to a place where one can find reputable meat, as opposed to cheap bookcases in my neighborhood, The Meat Hook, where I bought enough ground pork (freshly ground when I ordered it) for two weeknight meals of this dish. The flavor of  oyster sauce is pretty pungent so I feel like these noodles would work with ground chicken, or beef or maybe even crumbled tofu, depending on what your eating preferences are. One pound of the meat went in the freezer so that I could avoid being tempted to improvise that much ever again. The other pound got made into the kind of noodle dish I could eat week after week for dinner, and if D hadn't finished all the leftovers, I'd be happy to take it for lunch the next day too.   picnikfile_kLo8dA

 Pork and Oyster Sauce Noodles
Adapted (very little) from Ken Hom's Quick Wok.
 
8 oz. dried rice noodles
2 teaspoons sesame oil
1 tablespoon light-soy sauce
1 tablespoon oil (canola, peanut, vegetable)
1 pound ground pork
5 tablespoons oyster sauce
3 tablespoons chicken stock
1 teaspoon sugar
1 tablespoon finely chopped ginger
6 tablespoons chopped scallions
 
Prepare noodles by soaking them in a bowl of very hot/boiling water from about 15-20 minutes or until soft. Drain and rinse with cold water. Toss with sesame oil and soy sauce and set aside.
 
While noodles are soaking, gather all your other ingredients and chop ginger and scallions. It all comes together quick, so be ready. Heat a wok over high heat. Add the oil and meat and stir-fry 2 minutes. Drain off a little of the grease from the meat. Add the oyster sauce, stock and the sugar and continue cooking another 3 minutes, until meat looks mostly cooked through. Add the noodles, ginger, and scallions and stir-fry until everything looks incorporated and meat is cooked through, about 2-3 minutes more.
 
Serves 4 normal people, or 2 people with a warped sense of normal serving sizes.

Fourth-Night-Hanukkah-Huevos

PC140206.JPGI did some Hanukkah food research today, and to my surprise there are two schools of thought. One belief is that holiday foods must be fried, while others merely require the food be cooked with olive oil. The holiday foods I grew up with were always fried, so I assumed that is what they needed to be. But after consulting with the all-knowing, all-seeing internets, I realized that there are sources out there that do not feel the frying aspect is necessary. Despite fried food's deliciousness, I decided that I don't need to celebrate this particular miracle from thousands of years ago with trying to create my own miracle (namely not gaining a pants size or clogged arteries from eating fried food for 8 days). I'm going with the more sensible, "cooked with olive oil" tradition.

With that cleared up, I proceeded with a quick light supper (borrowed from my brunch repertoire) of Huevos a la Mexicana. It is basically eggs scrambled with the colors of the Mexican flag, green (chiles), white (onions), and red (tomatoes). It is another one of these modest dishes where a few very ordinary ingredients combine to make a fine meal. I always serve these egss with small corn tortillas for a more authentic flavor then the supermarket flour type.

Cook the onions in miraculous wonderful olive oil until translucent, then add the chiles (leave the ribs on for a spicier version), and the tomatoes. Cook for about 5 minutes until some of the juice from the tomatoes renderss out a bit, and the chile is no longer raw. Then pour in some beaten eggs and mix it altogether. Cover and let the eggs set. That's it, nothing fancy. Although this is not holiday fare to serve your relatives, it is technically within keeping with the tradition. It will allow you to bravely plough through one of the eight days without feeling remorse for subsisting on fried food and holiday cookies for the next week (or two). Viva la revolución!

PC140210.JPG

Hanukkah Huevos (a la Mexicana) Adapted from Mexico, The Beautiful Cookbook.2 tablespoons olive oil 1/4-1/2 onion, chopped 2 chiles, finely diced (serrano or jalapeno) 1 tomato chopped (or about 3/4 cup of diced canned tomatoes) salt 3-4 eggs, lightly beaten


Heat the oil in a skillet. Add the onion and saute until transparent. Add the chiles, tomato, and salt and cook over medium heat for about 5 minutes. Add the beaten eggs to the pan and stir to incorporate. Cover and cook for 2-3 minutes or until eggs are set. Break up with a wooden spoon once done. Serve with warm corn tortillas.

Deconstructed Elote aka My New Favorite Summer Salad


Elote is the Mexican name for grilled corn on the cob smothered with crumbly cheese, lime juice and a bit of cayenne pepper. It is a specialty in the Yucatan peninsula and lucky for me available in various restaurants and flea markets around Brooklyn, if you know where to look. However, if you haven't had one of these, please stop reading and go find one. It truly is one of the best street foods I can think of. It transforms a cob of corn into an explosion of flavor. I would make this treat for myself on a regular basis if I had access to a grill, but since I don't (sob, sob) I used to just wait until I went out for Mexican food to have it. That all changed last night. I think I'll probably make this little beauty of a salad at least once a week, or as long as I have access to the fresh ingredients. My corn on the cob actually came from my CSA. Now if we could only grow avocados up there...
On the issue of eating locally, I have been thinking a lot about how cooking different cuisines can work with a sustainable cooking philosophy. There are always going to be certain essential ingredients that are not going to be available locally if you're preparing dishes from regions and countries with a different climate. In summer I tend to cook a lot of Mexican or Mediterranean dishes, and things like citrus, or olives, or certain cheeses aren't locally sourced in the Northeast where I'm located (as far as I know). It's in these situations I think there is room for flexibility. The goal is to support sustainable food and food purveyors by voting with your fork, but it is not to suffer in the process. I think eating local is the right thing to do, and if everyone did it there would be a change in our broken food system. But, I also think allowing yourself to purchase things that are unavailable in your region is alright too. Phew. Glad I got that off my chest.

Back to the dish. I got the idea for this salad after reading Mark Bittman's article last week in the NY Times Dining section. It was another one of his mega-lists of quick and genius flavor combinations. If you missed it, go and read it here. I know I'm going to use this list again and again when I'm having a cooking block. It's no coincidence that I picked his idea for deconstructing elote for a corn salad as my first dish. It is perfect for a picnic, or when you don't have access to a grill. Or for someone who just wants to eat with a fork.

Basically, you take the corn off the cob and quick roast it until it gets a bit brown in a skillet. This will cause a wonderful toasted corn smell to infuse your kitchen. Combine that with the essential components of elote, fresh lime juice, creamy queso fresco, and some heat (either cayenne pepper or chilis) and you have elote in a bowl. I added a few ingredients to plump up the salad, which just made it a bit more into a meal. Once done, take your salad and a cold cerveza onto your fire escape and you can almost pretend you are sitting in a plaza in Mexico as the sun sets. Buen provecho!

Deconstructed Elote Salad
I mixed the leftovers with some cooked shrimp for lunch today. Options are endless.

3 ears of corn
queso fresco (to taste)
fresh lime juice (about 1 big lime or 2 small ones)
1 jalepeño, deseeded and minced
cherry tomatoes (about 1/2 cup)
1 scallion, chopped
cilantro (small handful)

Take corn off the cob with a sharp knife. Place in a pan with some olive oil and cook stirring to avoid it sticking, till the kernels have a toasted look to them. Place in a
bowl and mix with the cheese and lime juice. Chop all the other ingredients
you're using and mix together. Easy Peasy.

Easy-as-a-Summer-Day Cape Cod Cookies

It's a gorgeous summer weekend, the kind that really makes me wish I had a summer house (or more friends with summer houses). It's the type of weather that makes you wish you had planned a bit better in the winter to have some time set aside for a roadtrip to places that seem made for summer. Cape Cod is one of those special places, and it seems appropo that the cookies I made this week were inspired by its simple pleasures. These are the easiest, tastiest oatmeal cookies I know of. I baked these for my bi-monthly Dessert Corp contribution. (For more on Dessert Corp, see my earlier post on this great organization). They are the epitome of an easy dessert - no creaming the butter and sugar, and no special equipment is needed. Just you, your wooden spoon, and a big bowl.

This recipe comes from the Fannie Farmer Cookbook. This book has been sort of a cooking bible in my family. I have learned so much from this book, and still refer to it at times for information (although the Internet has been winning out lately - shhh!). These days I mostly use it for the baking recipes, as my culinary tastes have gotten a bit more exotic, but it is still an amazing reference book. Marion Cunningham included not 1, but 3 separate oatmeal cookie recipes in this book. I chose her Cape Cod version, only because the other recipe called for shortening, which is something I don't keep around and don't prefer to bake with.

I can tell you these cookies won't disappoint. They deliver a deeper, richer flavor than most oatmeal cookies I've tried, thanks to the addition of molasses. They are sweet and spicy, and warm and soft, the way the fresh-baked cookies of my dreams are. They are exactly the kind of cookie I imagine some storybook mom would serve up with a glass of milk to her kids after-school. Although, the feeling is just as nice for us grown-up kids when you bake a batch for yourself.

Easy-as-a-Summer-Day Cape Cod Cookies Adapted from The Fannie Farmer Cookbook. (These cookies work great frozen, so if you don't want to eat the whole batch, just spoon them out onto a cookie sheet, but instead of baking, place in the freezer until frozen, about an hour, and then store in a freezer-safe plastic bag. When ready to use, you can place them directly into the oven from the freezer, just increase the cooking time by 5 minutes.)

1 1/2 cups all-purpose flour 1/2 teaspoon baking soda 1 teaspoon cinammon 1/2 teaspoon salt 1 egg, lightly beaten 1 cup sugar 1/2 cup melted butter 1 tablespoon molasses (I use Blackstrap Molasses, which has a sweeter flavor than regular, if you can find it) 1/4 cup milk (reduced fat works in a pinch) 1 3/4 cup oatmeal 1/2 raisins (optional, dried cranberries would be nice too) 1/2 cup chopped nuts (optional)

Preheat oven to 350 degrees Fahrenheit. Whisk the flour, baking soda, cinammon, and salt together in a large bowl. Add the rest of the ingredients all at once (it'll work, don't worry) and stir together until everything is evenly incorporated.

Drop teaspoon sized cookies on a baking sheet. You may want to press them down a bit with the back of your spoon, as this batter doesn't spread much. Bake until edges look brown and cookies don't appear too gooey, about 10-12 minutes. Cool on a wire rack.