Give Back Friday

I have two traditions that I keep year after year on Thanksgiving weekend. One is baking a homemade pumpkin pie, and eating it for days after the holiday. And the second is making sure to donate to a hunger-related charity at some point during a holiday weekend in honor of food. I know that many people take a moment to be grateful for what they have, and I think that's great. But, I think we can all do better than that. There are even people that go the extra mile and volunteer in a soup kitchen, but that's not feasible for everybody. This is one time that logging on to a website and posting a $25 donation isn't a lazy form of support. It's exactly what you should be doing in between online shopping, wish list making, and eating leftovers. There are so many charities to choose from locally and nationally. In NY, I normally donate to Meals-on-Wheels, or the Foodbank of NYC. But if you're not sure where best to donate, you can always check CharityWatch or Feeding America for suggestions and a rating system on good organizations devoted to hunger issues around the country. It's something small that everyone can do between other less-than-ideal traditions such as, stampeding chain box stores and gorging themselves on food till they fall asleep. Feeling grateful for all that you have shouldn't end with navel-gazing at how content you are with your own life, but really extend into giving back just a little, because people going hungry in this country does not have to happen.

Spekkoek means "spice cake you should eat this holiday" in Dutch

As you leave for your holiday vacations, and make a mental list of all the goodies you might bake for a big Christmas feast, or to give out to friends and neighbors, I suggest you make room for spice cake on your list. It's better than fruitcake, it's less work than cookies, and it smells more festive than a pine-tree scented candle that someone re-gifted to you. You can even get fancy with it and bake it in lots of different layers, if you are so inclined, as the original version of this Dutch by way of Indonesia cake is sometimes made. You can make mini-ones for easy gifting, or pour the whole batter into a bundt pan, as I did, and than go do something else, like watch It's a Wonderful Life for the twentieth time.

Traditionally baked in many, many, layers it is often visually impressive. Click here and here for examples of how cool it can look if you want to spend the time. But, the thousand layer presentation is not my reason for posting this cake for you, it's simply the ease of it compared to the countless hours that you can spend decorating holiday cookies. If you're feelings time-pressured, or you happen to be short decorating elves, as I am, this might be a good alternative to the usual cookie sweatshop that I turned my kitchen into last year. Don't get me wrong, I loooove holiday cookie baking, and as I write this I'm still considering how many types I will eventually end of baking. But, this year, for my initial baking tasks, I went with a cake, after a conversation with a friend about what a time-savor it could be. Most importantly, spice cake belongs at the holidays. It's got that holiday smell of cinnamon and nutmeg, and it's not too too sweet for those scrooge types who don't appreciate sweets. I found this recipe a few years back on Leite's Culinaria and have made it once a year every year since because everyone who tastes it seems to approve heartily. It has a perfect light texture, and really could be made in a tube pan, a more decorative bundt pan, or mini loaf pans. I hope you give it a try, and I hope you have a wonderful holiday filled with all matters of sweet things.

photo.jpg

Spekkoek Adapted from James Oseland, Cradle of Flavor. If you choose to make it in mini-loaf pans, I'd adjust the baking time to 30-40 minutes depending on your oven, checking it at the 30 minute mark.

2 cups sifted cake flour (or 2 cups minus 4 Tbsp of all-purpose flour) 1/2 teaspoon baking powder 1 teaspoon grated nutmeg 1/2 teaspoon ground cloves or allspice (depending on your taste preferences) 4 teaspoons cinnamon Pinch of salt 1 1/2 cup butter (at room temperature) 1 2/3 cup sugar 4 eggs (room temperature) 3 egg yolks 2 teaspoons vanilla Powdered sugar to decorate

Take your butter and eggs out and let them come to room temperature. Preheat oven to 325 degrees Fahrenheit and grease and flour a bundt pan (unless you have a non-stick one).

Sift the flour, baking powder, spices (nutmeg - cinnamon) and salt. Sift twice.

With an electric mixer cream the butter until very soft, then slowly add sugar. Beat on high for 5 minutes until mixture is pale and fluffy. Add eggs, one at a time and beat for another 2 minutes. Add flour mixture in 3 parts beating on low until well incorporated. Add eggs yolks and vanilla. Mix until combined.

Pour cake into bundt pan and bake for 45 minutes to an hour. To make sure it's done, test to make sure toothpick comes out clean from thick part of the cake.

Let cake cool in the pan on a rack for 10 minutes before flipping out of the pan onto a plate. Let cool completely and then dust the top with powdered sugar.

The Hanukkah post that wasn't

"moto at hanukkah"Hanukkah officially ended yesterday. Eight days of blissful fried food eating and staring at the blurry burning candles as you sink into a food coma. I enjoyed it. I ate a heck of a lot of fried food. I'll admit I'm not a big fan of Hanukkah menus and the ways they try to create a table of exotic flavors, that frankly I have never once seen at a Hanukkah party. They seem phony. Maybe I need to know more Jews from Morocco. I didn't even think of trying to create one. As for what I did fry up this year -

I finally got around to trying a Potato Nik, in place of a million little potato latkes (pancakes) from the New York Times. It was easy and delicious. I'm going to make this more in the future, even if it's not Hanukkah. It's addictive the way a Spanish tortilla is. It's very similar to a Swiss Rösti. Yum. I had some flipping problems and it wasn't a beauty, but it still tasted good. I made some quick homemade apple sauce to serve with it. If you weren't aware that homemade applesauce is a million times better than the stuff in the jars, I'm posting the recipe below.

The other dish was more ambitious and was intended to be a post here. It started when I picked up a gorgeous orange-skinned kabocha squash (seriously I used it instead of flowers for a few days on the kitchen table) at the Farmer's Market. I intended to try a Japanese recipe for Pumpkin Croquettes, basically kabocha squash cooked and mashed and breaded in panko. It seemed festive thanks to the color and it was fried for the holiday, and it incorporated one of my favorite cuisines. Success, right? Wrong, wrong, wrong. Either Harry Hanukkah hates me this year, or I don't have any idea how one would take mashed kabocha and attempt to roll it into croquettes for breading. It was watery, which is strange cause I had read that kabocha squash was known to be just the opposite. It was a mushy mess in my hands as I added more, and more, flour hoping to get it to hold its shape. I considered photographing it for anyone reading this to get a good laugh, but my fingers were so covered with orange goo that picking up the camera to shoot this bowl of watery mash seemed even more ridiculous.

I tell you all this cause I had almost forgot about this kind of epic kitchen failure. It thankfully had been that long. But, in the end it was not salvageable, and neither was my enthusiasm for frying anything again. At least for a little bit. Please send me words of wisdom if you know what I did wrong. Looking ahead, the end of the festival of lights means I'm on to other holiday desserts and other festive foods that do not involve squash. If you celebrated Hanukkah, I hope you had a happy, healthy and kitchen mishap-free one.

Potato Nik Reprinted from NY Times. Serve with applesauce and/or sour cream.

Applesauce Take 3-4 apples, tart are preferred, but sweet ones are fine too, the sauce will just be sweeter. Peel them, and core them and cut into big chunks. Place in a pot or a microwaveable bowl. Add sprinkling of sugar if they are sweet apples and up to a teaspoon or two if they're tart. Cook until they appear soft (or microwave for 5 minutes) and can be mashed to your desired consistency. At this point add a dash of cinnamon or nutmeg if you'd like, and cook another 2 minutes. Easy, peasy.

Thanksgiving - Pear Pie with a Gruyere Crumble topping

picnikfile_DZa1JN Thanksgiving for me is about comfort food and sticking with tradition, maybe throwing in a new twist here and there to keep it interesting. I didn't cook Thanksgiving this year, and in fact, except for one year, I have never been responsible for hosting the holiday. Generally, I volunteer to bring a dessert, since I feel like dessert should always be homemade on Thanksgiving. I've eaten my fair share of grocery-store bought pie, and it just doesn't cut it. I started making pumpkin pie around 17 years old, and that's always a staple. This Thanksgiving, I made a pie that I first tested last year at a pie contest in Brooklyn that I think I'll be adding to my list of traditions (for the record, I heard it came in the Top 10). It's a pretty simple recipe, with pears and a crumble top mixed with shredded Gruyere cheese, and a dash of Cayenne pepper for some unexpected heat. In my opinion, you'll always need pumpkin pie at the table, but this is a pie you'll always want at the table once you give it a try.

Pear Pie with Gruyere Crumble This recipe is more of a blueprint than a recipe. Vary the types of cheese. vary your spices, or if you want add additional fruit.

For the pie filling: 5-6 pears peeled and sliced (use whatever kind is in season for you) 1 tablespoon lemon juice 1/2 cup brown sugar 3 tablespoons cornstarch 1/2 teaspoons cinnamon 1 Unbaked pie crust

For the crumble topping: 1/2 cup all-purpose flour 1/2 cup brown sugar 2/3 cup shredded Gruyere (+ 1/4 cup for topping, optional) 4 tablespoons butter 1/8 teaspoon cayenne pepper

Preheat oven to 400 degrees Fahrenheit.

Toss sliced pears with lemon juice in a large bowl. Mix in the mixture of brown sugar, cornstarch and cinnamon in a separate bowl, then mix into the pears until evenly coated. Set aside.

Roll out the pie dough (homemade is best), into a 9 inch pie plate. Fill the pie with the pear mixture. Set in refrigerator so pie crust can hold its shape while you prep the crumble. Mix all ingredients in a small bowl, then add the butter in with your fingers, until the mixture resembles coarse crumbs.

Top the pie with the crumble topping and bake for 45 minutes, or until golden brown. If you wish, in the last 15-20 minutes of baking, sprinkle another 1/4 cup of shredded cheese on top so that it can melt. Let cool on a wire rack before serving.

What to do with matzoh

March 073.jpg

Newsflash - matzoh covered with caramel and melted chocolate is good. It's stand over the stove and greedily eat half a tray good. The kind of good that you will actually want to eat any time of the year. So why post a recipe for something this basic?  Well, I've seen and tried a fair number of chocolate-covered matzoh in my day, and well, frankly matzoh may be one of the few foods on earth that doesn't improve when covered in chocolate. It's that bland. I always assumed that was because the only good food you could find that was kosher for passover, was food that just didn't involve matzoh in any form. In general, with the exception of matzo-ball soup, I figured Passover was mostly filled with culinary creations meant to make you feel sorry for yourself that this holiday wasn't celebrated with chocolate-shaped bunnies. But, this Sunday, one night before Passover began, a culinary miracle was being prepared in my friend Shana's kitchen. Chocolate-caramel-covered matzoh that actually made me think, if it's possible to make matzoh taste good, it's possible Moses parted the Red Sea (for a brilliant illustration of this Biblical story click here).

Matzoh, the unleavened, cracker-like bread product that Jewish people eat in place of bread during the holiday of Passover (hey?! some people might not know) while, pleasantly crunchy, has the flavor profile of food you eat while getting over a stomach virus. So, when I sat down to think about my favorite Passover dessert foods, I didn't get very far. I am a strong believer that the desserts that are flour-free by choice are the best bet for this holiday, flour-less chocolate cake, flans, and nut-based cookies and cakes. But, those aren't always the simplest to make and in the interest of time (no one really gets off from work for this holiday) and as a great idea to make with any kids that may be around, I thought I'd post this recipe, along with some other really really simple Passover dessert options that have managed to win me over in recent years.  Funny enough, all my favorites come from who else, Martha Stewart. And since she improved on Passover desserts, I'd like to propose we make her an honorary member of the tribe, if she wants to accept. Here are some links to her Macaroon recipe (shredded coconut "cookies" that are customary) and a Matzoh Bark recipe, that easily adapts to any tastes and is simple enough to be a pre-school cooking project. Both of these recipes I make without changing a thing, accept how you choose to decorate. MacaroonsMatzoh Bark

This chocolate-caramel matzoh recipe is Martha's as well, and my favorite of the three. And to be honest, you could make it without a single change and be quite content with the results. The combo of the slightly salty caramel with the crunchy texture of the matzoh and almonds is hard to improve on. But having made it a few times already in the past two days (it's completely addictive) I think there are a few tweaks that make it work a bit better and quicker. I shortened the cooking time a bit, and most importantly I wait to break up the matzoh until the very end, which leaves you with less crumbly little pieces. (Although this also leaves less for the cook to snack on). This matzoh will definitely do for you, what no Passover dinner ever managed to do for me, help you forget about the missing basket of tinfoil-wrapped chocolate eggs, if just for a night or two.

Chocolate Caramel Matzoh

Adapted slightly from MarthaStewart.com

  • 4 sheets of matzoh
  • 1 cup of sliced or slivered almonds (or any topping you'd prefer) 
  • 1 stick of butter
  • 1/2 cup of brown sugar
  • 1/2 teaspoon of kosher salt
  • 2 tablespoons of water
  • 1-2 cups of chocolate chips (or any chocolate you have on hand, melted)

Preheat oven to 325 degrees. Line 2 baking sheet with parchment.

Place 2 sheets of matzah on each sheet and scatter almonds evenly on top. Set aside to make the caramel.

In a saucepan, bring butter, sugar, salt, and 2 tablespoons water to a boil over medium, stirring constantly. Working quickly, drizzle over matzohs. Using a heatproof spatula, spread mixture evenly to coat. Bake until golden, about 20-30 minutes. Watch carefully last 10 minutes so it doesn't burn.

Remove from oven; sprinkle with chocolate chips. Let chocolate melt 5 minutes; spread chocolate over matzoh. Don't worry if there are some spots without chocolate. Refrigerate until chocolate has set.

Break into pieces, and serve. (To store, refrigerate in an airtight container).

Gingerbread Cookie Decorating Party

PC130198.JPGI love gingerbread. It is a holiday classic. It may not be inventive or cutting-edge, but not everything should be. The recipe I follow came from Bon Appetit's December 2006 issue. It is slightly spicy, with a deep brown-sugar and molasses flavor. It puts a twist on tradition by suggesting you flavor your icing with juniper berries. This part I could take or leave. I know there are a million and one gingerbread recipes out there, and every year I say I'm going to experiment with others, but for the last three years all those who have tried them seem to love them so that I haven't found a reason to mess with a good thing. I wanted to share this recipe with you in case your looking for a well-tested classic version. PC130180.JPG I normally make these cookies at least twice during the holiday season. The first batch always seems to disappear before being wrapped up and gifted out to friends and family. The only changes I've made to the original recipe are switching out light brown sugar for dark, and using unsulphured blackstrap molasses in place of regular. It's a subtle change that make for a more intense cookie. It is the perfect cookie to practice your decorating skills on (and I learned I could use a LOT more practice) and make into a snowy weekend project. This batch was made after a wonderful holiday brunch my cousin hosted during Hanukkah. It was too cute to see four people each measuring out different ingredients and generally buzzing around the table. mosaic62cb9d129a8a15fe6a2da6004ae037425bbca69e mosaic05fb6e7b331d4d03440f57c3877176aaa71cd18b After the dough rested, we set up two separate rolling stations (photos at this point were getting a bit blurry after a few mimosas) and went to work lining up the cut out shapes on silpat or parchment-lined baking sheets. This would be perfect work for little kids, but the only kid we had on hand was still too little to help. Not that any of us big kids seemed to mind handling the task. These cookies bake up crisp, and the thinner you roll them out the crisper they will be. We went with about 1/4 inch thickness on the dough to have them be a bit more chewy. They also need to be carefully watched towards the end of the baking time, unless you don't mind them a bit well-done around the edges (I save those imperfect ones for myself). PC130194.JPG Once they're baked, let them cool and prepare the royal icing to decorate as you wish. That's when the real fun comes in. This time around we skipped the juniper flavor used in the original recipe (of course if you want to give the juniper a try, find it here). We used lime juice in place of lemon juice for the royal icing, simply because we were out of lemons. But we all agreed the lime was a nice little twist that we would make again. We used Martha Stewart's royal icing recipe, and it was a very good thing.

Gingerbread Cookies Adapted from Bon Appetit. See links above for two different icing options.

2 1/4 cups unbleached all purpose flour 1 teaspoon ground ginger 1 teaspoon ground allspice 1/2 teaspoon ground cinnamon 1/2 teaspoon baking soda 1/2 teaspoon salt 1 cup (2 sticks) unsalted butter, room temperature 1/2 cup (packed) dark brown sugar 1/4 cup blackstrap molasses

Whisk first 6 ingredients in medium bowl. Beat butter and sugar in large bowl until fluffy. Beat in molasses. Beat in dry ingredients. Gather dough; divide into 4 pieces. Shape into disks. Wrap; chill at least 2 hours and up to 2 days.

Preheat oven to 350°F. Line 2 baking sheets with parchment. Roll out 1 dough disk to 1/8-inch thickness. Using 3 1/2-inch cutter, cut out cookies. Transfer to sheet. Gather scraps; chill.

Bake cookies until almost firm in center, 12 minutes. Cool on sheets 2 minutes, then cool on racks. Repeat, using all dough.

Note: Cookies can be stored in an airtight container at room temperature up to 3 days or freeze up to 2 weeks.

Holiday Lace Cookies

PC160250.JPG 
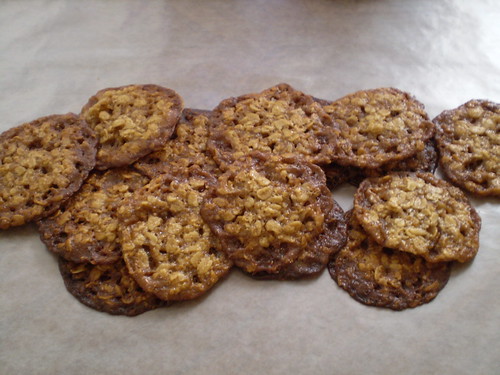
You know these cookies. You've seen them in the cookies by the pound section of the bakery case. You've even eaten them before and loved them, most likely without knowing their name. They're an old-fashioned cookie, generally known as Lace Cookies because of their porous looking appearance. It appears there are lace cookie variations from one European country to another (like most cookies). French lace cookies were traditionally made with almonds, while Irish lace cookies were made with oatmeal and milk or cream, and German lace cookies are also oatmeal-based cookies, but with ginger, cloves and cinnamon added. My recipe came from the Fannie Farmer Cookbook, originally written to help bring some consistency to our young country, by creating recipes that were formulas. Fannie (as I like to call her) Americanized things in the process by removing any country of origin, and simply called them Lace Cookies. Additionally, many newer American versions today call for corn syrup, but I prefer to bake with butter when I can.

PC160213.JPG

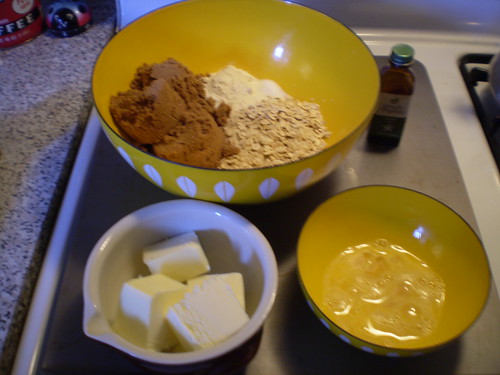
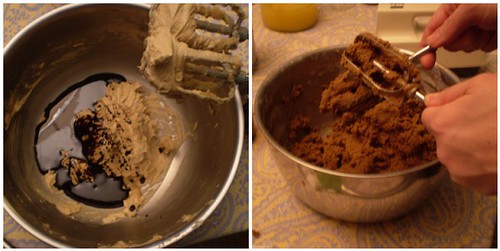
I'm entering this into the Share Our Strength, 12 Days of Sharing cookie jar. (A great cause, read more about it at In Jennie's Kitchen).This cookie recipe should be categorized under, Stupidly Simple, because it is. Mix dry ingredients in a bowl. Pour melted butter over it, then a beaten egg and some vanilla. Drop onto a cookie sheet and bake. Nothing more too it. It's the kind of recipe you'd be well-served committing to memory to whip up off the top of your head while visiting family, or away for the weekend skiing. The results would impress your onlookers and fool everyone into thinking your a culinary whiz in the kitchen. Sit back, smile, and think, "Ha, ha."

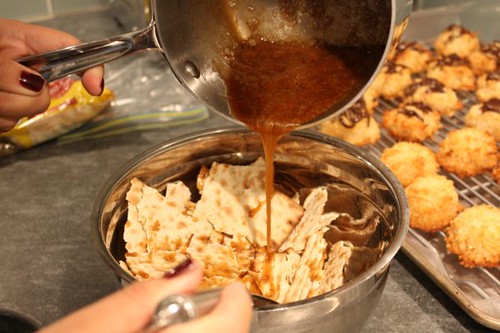
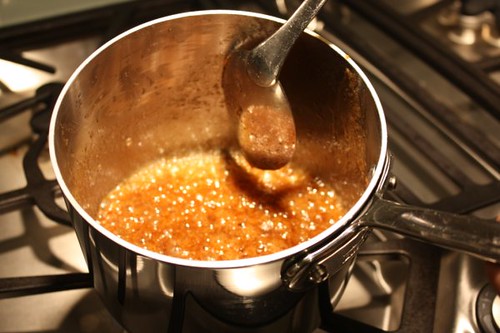
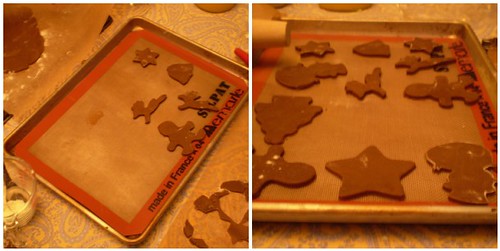
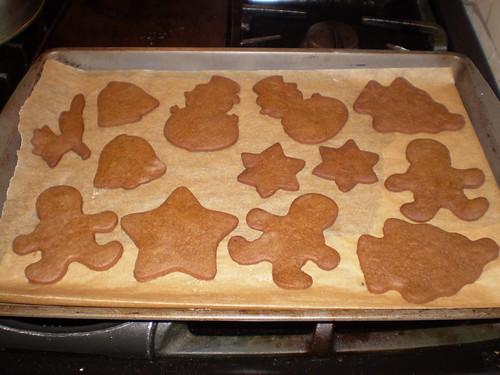
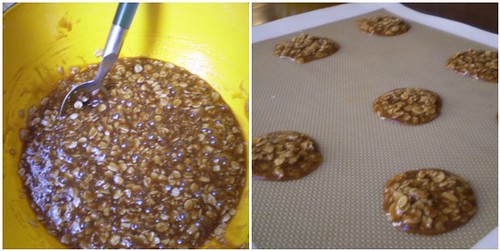
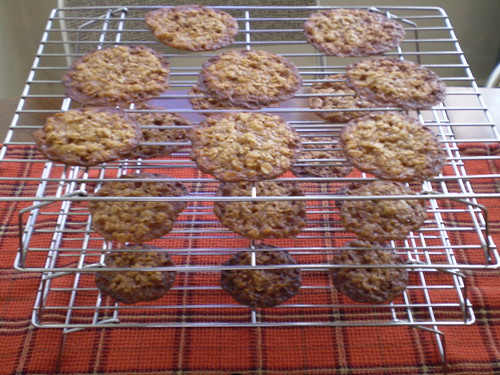
There's only a few tricks to know how to pull this recipe off without a hitch. First, you must must space the cookies at least 1 1/2 inches to 2 inches apart, depending on the size of your cookies. Second, you should stay close to the oven while these babies are baking. They go from well-done to slightly burnt quickly. My suggestion is to keep the oven light on (if you have one) and keep an eye on them after they've been in there for 3 minutes. Plus, it's fun to watch the cookies bubble away and bake. Third, you really must use some patience and give them a few minutes to cool before you try to move them off the cookie sheet. If you slide your spatula under one while it is still hot it will squish into the middle and resemble a piece of caramel. That is an irreversible error. Obviously it will still taste good, but baked goods should also look good too.

mosaic12198e095cd8ebebc96159ac667b67bc5cd6a1fe

mosaice19e9f8404f44b4fbc21594743037eefd1237261

This being a holiday cookie, you should consider some options to gussy up your cookie creation. Consider shaping the cookies into a tuille by bending them around the handle of a wooden spoon while still warm (not hot). Then let them cool in that shape. This is a pretty example of how a tuille shape makes a more impressive presentation. My personal favorite is the way I had them as a kid, where the bottom is coated with melted chocolate. Yum. And, coating things with chocolate seems like a good task to include the kiddies in on. (Personally, I wish someone had let me do that as a kid, rather than play with a dreidel. I'm just saying.)

PC160245.JPG

Holiday Lace Cookies Adapted from The Fannie Farmer Cookbook

1 1/2 cups uncooked oatmeal (not anything instant or quick-cooking) 1 1/4 cups brown sugar 2 tablespoons flour 1/2 teaspoon salt 2/3 cup (about 10 tablespoons) melted butter 1 egg, lightly beaten 1/2 teaspoon vanilla

Preheat the oven to 350 degrees Fahrenheit.

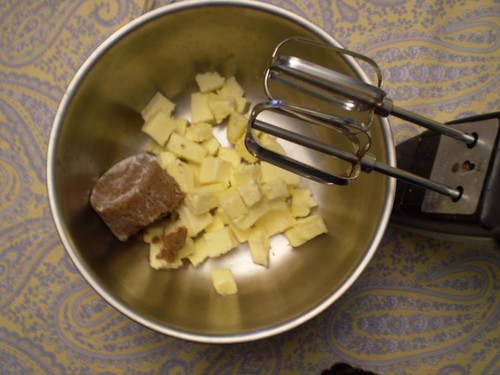
Mix the dry ingredients together in a big bowl. Melt the butter. Add to the dry ingredients and mix to combine. Add the egg and the vanilla and mix until all incorporated.

Line a baking sheet with a silpat or parchment paper. Drop cookies about 1/2-1 teaspoon at a time onto cooking sheet. Take care to keep them spaced about 2 inches apart. They will look small but will spread as they bake. Bake in the oven for 5 minutes or until firm. Watch them closely after 3 minutes, depending on how well done you want them. Let cookies cool on the baking sheet for a few minutes before you touch them. Carefully, using a spatula lift off baking sheet to cool completely.
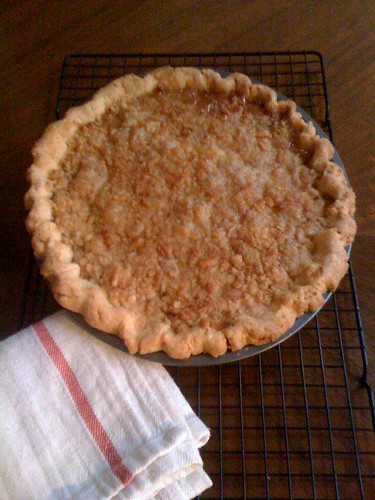
12DaysCookies_badge-1

First-Night-Carciofi-alla-Judea

PC100148.JPGHanukkah may have some traditional foods, potato latkes (aka potato pancakes) and sufganiyot (aka jelly doughnuts), but in general the rule is anything fried goes. So, while shopping for potatoes to make latkes, I changed my plans when I saw these striking artichokes in the market. I had to have them. They were beautiful and festive, perfect for a holiday meal. Next, I set out to think about what I could do with artichokes for the first night of Hanukkah. I recalled reading about a fried artichoke preparation that originated in the Jewish ghetto of Rome, simply called Carciofi alla Judea (for more about the history of this dish click here). I have never had one of these prepared for me, but I thought, "how could anything fried taste bad?" Unfortunately, there was nothing miraculous about this meal, except for the amount of olive oil I wasted. PC110153.JPG I jumped on this idea, lured by images of lightly browned, crunchy, earthy artichoke petals that would impress you and inspire you to put down the potatoes and fry something different. I didn't do my research. If I had I would have seen that this dish is best prepared with baby artichokes, for their more tender leaves. I might also have realized that frying them whole was an option, as used in some other versions of this recipe. PC110159.JPG The recipe that I found and put my faith in (it was on a great Jewish blog after all) called for peeling off the tough outer leaves and slicing the artichoke in half before you start on the two-step process of cooking them in a mixture of olive oil and water until softened (see the photo above), and then frying them until crispy. PC110167.JPG My artichokes looked like fried goodness, glistening as they came out of the olive oil. After a sprinkle of some fleur de sel salt and a squeeze of lemon I could barely wait to grab a piece. I started with the outer leaves that looked more well-done, hoping that it would taste like a crispy french fry. Not exactly. The tops of the leaves were tough and difficult to chew, if not near impossible. "Ok", I thought, not giving up hope, "the inside leaves will be better". They were better, but not great. In the end, I resorted to eating the leaves as if they were steamed, scraping the tender bottom part off and discarding the rest of the leaf. We agreed that it seemed like a waste and definitely not the intended result. PC110175.JPG The one saving grace of this dish was the artichoke heart. I guess that's why I couldn't be too upset. It was tender and a bit smoky tasting from the oil. It was definitely good eating, especially with a bit more salt. I'm sure my inexperience in making these was to blame for the flawed result. However, I bet they could be spectacular when done correctly, so please do not let that discourage you from trying this dish (just make sure to get baby artichokes). And, the best part of Hanukkah, there are 7 more nights to fry things and get them right.

Carciofi alla Giudia Reprinted from The Jew and the Carrot (http://www.jcarrot.org)

4 medium sized artichokes (look for vegetables with soft, long, flexible stems) 1 lemon Plenty of olive oil Sea salt to taste

Fill a large bowl with water and the juice of one lemon. Working one artichoke at a time, trim the stem to 1 1/2 – 2 inches. Using a vegetable peeler, remove the outer dark green layer of the stem, revealing the softer, lighter green center. Cut off the artichoke’s thorny top (horizontally) using a serrated knife and then carefully slice the artichoke in half, (vertically).

Remove the artichoke’s tough outer leaves until only the soft inner leaves remain. Using a small spoon, remove the hairy “choke” at the center of each artichoke half. (It may seem like you are wasting a lot of the plant –which is kind of true. Assuage your guilt by composting them!)

At this point, open your windows and turn on a fan!

Fry #1: Select a pot that is large enough to comfortably hold all of the artichoke halves. Place them in the pot, fill with oil until chokes are half covered. Then add water to cover. Bring pot to a simmer and cook, uncovered, about 15 minutes until they are cooked but not too soft. Remove with tongs and place on a platter.

Fry #2: Heat about one inch of oil in a cast iron pan (or other heavy pan). Using a pair of tongs, and lots of care, place the choke halves side down in the oil. Be really careful–hot oil splatters and hurts.

Fry for about 12 minutes, flipping the chokes halfway through, until brown and crispy on both sides. Turn off the heat and remove the fried chokes with tongs. Place onto paper towels to drain. Sprinkle with salt and serve warm.